One of the cool features of Windows Home Server is being able to set backups of the other computers on your network to the server. Today we take a look at the process of configuring a computer on your network to be backed up automatically to WHS.
Backup to WHS
To backup a computer your network, open the Windows Home Server Console and select Computers & Backup. Right-click the computer to backup and select Configure Backup.

The Backup Configuration Wizard kicks off…

Wait while the Configuration Wizard collects information…

Choose the disks you want to backup…notice you can also choose external drives if you wish to back them up. Note that the disk needs to be formatted as NTFS, if it’s not then it won’t be displayed in the list.

Now choose the folders you want to exclude from the backup. The grayed out locations are automatically excluded but you may want to remove them from the exclude list. If you want to exclude other folders click on the Add button.

Now go through and select the folders to exclude from the backup. To reduce the size of your backups, you might exclude large media files and unimportant documents, pictures…etc. Make sure you don’t exclude your most important documents, pictures, and other data.

After you’re done excluding folders from the backup, click Next to continue.

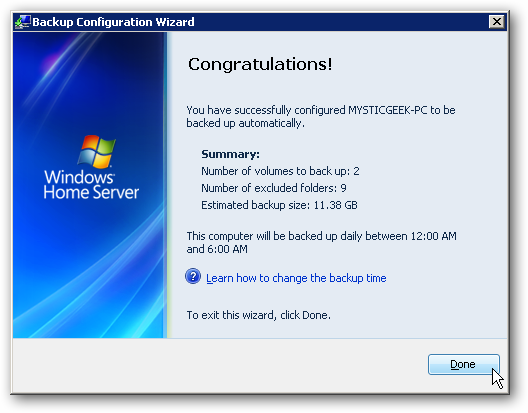
Then you’ll have the Congratulations screen showing a summary of the backup size, the time of day backups will occur, and the backup frequency which is daily.
After the backup process completes you’ll be able to see if a computer has been backed up or not in WHS Console.

If you want to change the time of day backups occur, click on Settings in WHS Console then Backup. Under Backup Time you can change the start and end time to what fits your schedule.

To view a backup just right-click on the computer and select View Backups.

It opens the View Backups window where you can verify and manage your computer’s backups.

Conclusion
This will get you started with backups and you’ll have peace of mind knowing that your computer’s data is being backed up to the server. The process is relatively simple and the main thing is to make sure the backups aren’t needlessly large with unnecessary files (such as large multimedia files). There’s a lot more administration you can do with backups, and we’ll be taking a detailed look at managing them in future posts…so stay tuned. Remember that you can download a free 30 day trial of Windows Home Server, so if you have an extra machine you can dedicate to being a server, you might want to check it out.


If you need product key for windows, i suggest you to Softkeyhome.co.uk. The key is cheap and genuine.
ReplyDelete